Installation
Installing HRM Extension is quite similar to other extension you are installing from FrontAccounting repo. Let me give you the simple steps to follow and install in it.
Note:** Always remember, before trying with any new extension of plugin, just take a complete copy of database and whole FrontAccounting directory. It's good for backup and keep separately for future restoration.
Get the ExtendedHRM.zip and extract it on to the working FrontAccounting extension directory. `ROOT OF FA/modules/`.
Now, Login to your FrontAccounting main company and goto `Setup-> Install/Activate Extensions`.

Now, it will show you the `Payroll` in the extensions list. you can simply install it by clicking the 'Install' Icon. Once it installed, you have to activate it for company. So, you have to select the company you want to work HRM module from the top drop down.("Activated For'Your Company Name' ").
Note:** For FA 2.4.1, 2.4.2, 2.4.3, you need to do one more step to install. You might encounter an warning message with package cant be installed issue. When you face this issue, you need to goto files of your FA/company/0/installed_extensions.php. Here change this to be like this.
array (
 'package' => 'ExtendedHRM',
 'name' => 'Payroll',
 'version' => '-',
 'available' => '',
 'type' => 'extension',
 'path' => 'modules/ExtendedHRM',
 'active' => 1,
 ),
Here, change the version `'version' => '2.4.1',` like this. and than try again, it will install the extension
Here, check the Payroll checkbox to install the tables and activate the extension to your desired company.
Note : ** These below three changes are not necessary for the recent version. From our installation module, we do this with that. Incase if you are using old version FA. or old program to upgrade. You can follow the below steps. otherwise leave it.
Add Types to Core
There are some specific changes needs to do within Core of FA. Here is it Just open your FrontAccounting files folder and followed by
ROOT_OF_FA/admin/db/transactions_db.inc Here you can find the function below
function get_systype_db_info($type)
Around line no :183 here you have to add one more line within it.
        case    ST_EMPLOYEE   : return array(TB_PREF."kv_empl_salary", null, "id", "empl_id", "date");
	case    ST_EMPLOYEE_LOAN   : return array(TB_PREF."kv_empl_loan", null, "id", "empl_id", "date");
	case    ST_EMPLOYEE_ENCASHMENT   : return array(TB_PREF."kv_empl_leave_encashment", null, "id", "empl_id", "date");
Add the above line just end of the similar line within the function.

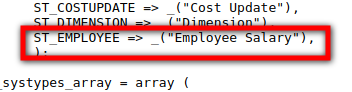
ROOT_OF_FA/includes/sysnames.inc
Here within the $systypes array
        ST_EMPLOYEE => _("Employee Salary"),
	ST_EMPLOYEE_LOAN => _("Employee Loan"),
	ST_EMPLOYEE_ENCASHMENT => _("Employee Leave Encashment"),
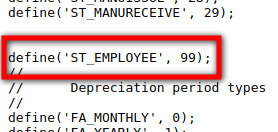
ROOT_OF_FA/includes/types.inc
Here define our type employee with 99 .
        define('ST_EMPLOYEE', 99);
	define('ST_EMPLOYEE_LOAN', 98);
	define('ST_EMPLOYEE_ENCASHMENT', 97);

// Payment types
define('PT_EMPLOYEE', 6);  // Add this under define('PT_DIMESION', 5);
Configuration And Setup
After Installing HRM module, you need to setup some configurations based on your need and choice. Let's begin with one by one. Now, you can able to see a new tab or new menu in the FrontAccounting. Which is 'HRM'. But, the links where disabled due to access permissions. we need to setup the access to the right users.
Goto `Setup -> Access Setup`. and select the desired user role to provide access permission.or System administrator for testing purpose.
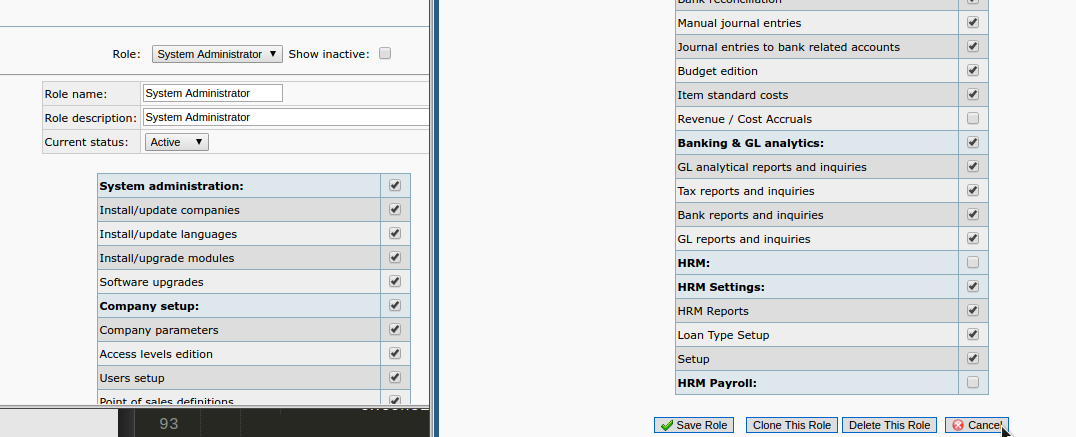
The below, components are already got access persmission and you can find our access level's at the bottom of the list. Check all the checkbox to enable the full access to the right user roles. Save the role and loggout and login again to get users access on the HRM module.
Hope you have got access to ExtendedHRM and logged in Again. Now you are ready to configure the initial settings of Payroll and HRM. so just goto `HRM-> Settings` to provide basic settings for the HRM module.
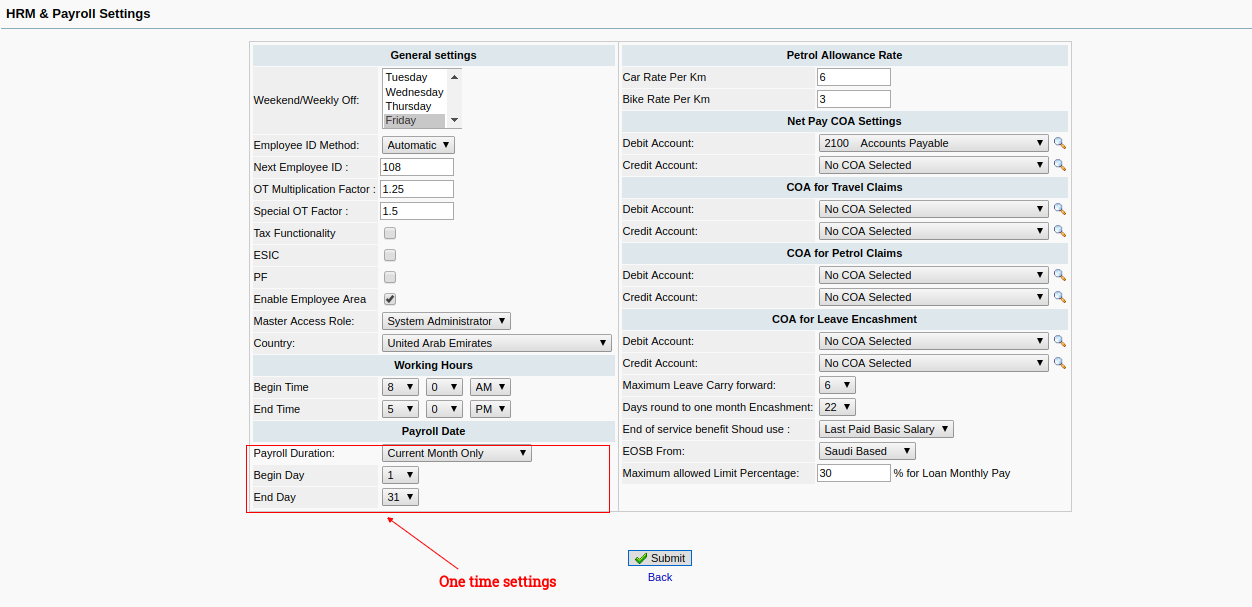
The settings has some important things, From the above screenshot you see the highlighted box with text. That settings is one time settings. so make sure you have right things there, before you click submit.
You can define, weekly off date for a company - this will be used during the time of attendance and leave calculations.
Employee ID - either automatic, or manual, the automatic can keep the sequence and add employee numbers in an order. Next Empl ID, also you can change it .
OT Factor, and Special OT Factor is available to set, the Special OT is used when the employee works on gazetted holidays.
Tax - Enable Tax or not.
ESIC,PF modules are available in India and its for indian users.
Enable Employee Area - this helps to create login access to employees and they can able to login and see their profile and check salary history, and apply leave and get status of it.
Master Access Role - the main system administrator or the person, who wants to access the whole system
Default Country, Company Begin time, end time, This time can be used, when the employee has not assigned any shifts.
Payroll Date is some advantage to set the payroll calculation days, Some countries, they calculate payroll every month, which is fine, and some countires, they process it from previous month and current month, like previous month 25th to current month 24th. In other case, the current month, and next month, like 20 days in current month and 10 days in next month, and the payroll will be processed after the next month date.
car, bike, petrol allowances and its rates per km.
The default COA for some options, hope its not complicated to understand.
The Leave Encashement and leave forward limits to forward leave to next year.
There after, you are requested to add employees and followed by their profile details completely.